
 This Dear Jane block, B11 - Melissa's Cross, took a lot of effort before I ever got around to cutting the fabric and handpiecing the block. As I explained in my post on May 6, Jane's block and Brenda's draft do not match. The photos at the two links below say it all.
This one matches Brenda's draft (Sorry, the link is broken. But if you try this link, you will see the variety between different versions of this block.) The points on the diamond are cut off; the diamond outline and it's crosshairs are two different widths -- on Jane's block, they are the same width.
This one more closely resembles Jane's block -- with a few differences: on Jane's block I never could decide if the 4 curved pieces were forming a circle or a square with rounded corners but, this example makes them into a circle; the diamond outline and crosshairs are still two different widths. Notice that in Jane's version the points of the diamond unit extend beyond the edge of the curved area.
Drafting
These minute differences add up to two blocks t
 hat are similar but not identical. I decided I wanted my block to more closely resemble Jane's, so I pulled out my graph paper, pencil,
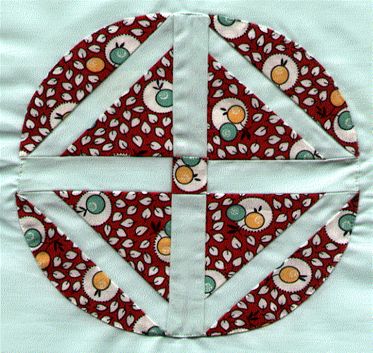
  and ruler, and made several drafts. I tried different widths for the crosshairs -- first 1/2 inch and finally 3/8 inch. [NOTE: These are the measurements after the block is pieced. They are all cut bigger to create seam allowances. Read below for more details about seam allowances.] In the upper block, I drew a different curved piece (freehand) in each quarter so I could pick one. I chose the curve I liked the best, cut it out, and then recut it out from a piece of paper folded in half -- to assure symmetry. In the end, I decided to make the crosshairs 3/8 inch wide and the curved pieces are not exactly a circle.
Cutting and Marking
Two different fabrics were used for the fussy cuts. For seams that I know I will trim later, I'm not very precise -- I just cut it larger than I need it. As I cut the fabric, I leave at least 1/4 inch for interior seams -- and 1/2 inch on the outside edge of pieces that will join to the sashing to give myself some wiggle room in case things get wonky. That's my "Dear Jane Insurance Policy." When I cut the pattern and fabric, I marked the centers of the curved seams so I would know how to position them. If I could change one thing, I would have marked the pattern pieces to show where the first corner unit is joined to the diamond-shaped unit -- for step 5 below.
Seaming Sequence
- Sew the long sides of one of the crosshair bars between two triangles. This forms a triangular unit. Repeat for the other side. You will have 2 triangular units with one of the crosshair bars running up the center. I trimmed the seams quite narrow because I wanted to press the seam allowance toward the crosshair, and the crosshair bars are only 3/8 inch wide.
- Sew the 3/8 inch square between the short ends of two of the crosshair bars. That unit is long and narrow. Trim seams.
- Assemble and sew the 3 units to form the center diamond unit. Trim seams.
- For each corner, sew the two curved pieces to form a piece that looks like a triangle with one corner cut off. I clipped the inside curve and pinned the seam as Anina describes in this tutorial. Sewing curves has been so easy ever since I applied her method to my handpieced curves; that means I do a lot less applique these days.
- Attach the 4 corner units to the center diamond. Think about where you are attaching the first corner. The rest will be easy.

7 comments:
I did the same thing - Figured out that 3/8" was better than 1/2", and that the circle was not quite circle. Your block turned out great!
Gorgeous! Thank you for sharing how you re-drafted the block to look more like the original. I'm doing that as well, but am trying it in EQ. I hope mine turns out as wonderfully as yours has! :)
Wow! I'm impressed. I did my version in EQ and am quite happy with it, but then it doesn't take much to make me happy. :-)
Just perfect! I have no idea how I am going to tackle this block, but I will be reading your method carefully. Thank you for sharing.
Minka, oh it looks great! I know you put tons of work into this one, and your right, it was worth it. So, the the white strips are 3/8 in with out seam allowance? Also, did you applique the outside edges then piece them to the center? I think I have it figured out but wanted to make sure. You have calmed my nerves about this block, now I am excited to make it. Thanks so much. Love Stacy
Stacy,
I edited my directions to answer your questions, but here are the quick answers:
The entire block is hand pieced -- no applique however, it could also be done that way. Use the method you are most comfortable with for creating curves.
The 3/8" is AFTER the pieces are sewn. I cut them with 1/4" seam allowances -- except for the outside pieces where I try to leave at least 1/2". After sewing, I trimmed many of the seams in the center to reduce bulk.
Your block is absolutely beautiful. I can only hope that mine looks as good.Thanks for sharing your technique.
Post a Comment